Overview
This article provides important information for customers looking to carry out bulk operations (add/update/delete) for their FaxMaker Online users.
Information
GFI FaxMaker Online Administrator Portal provides a way to import users in bulk but no direct way to export already created users. In the absence of export functionality, the list of users can be manually exported by copying the users' list from the browser and editing as appropriate using a text editor or Excel.
Bulk deletion of users from the UI is not supported. It is recommended that users are deleted individually since removed users are not recoverable and settings are lost irrevocably. If in doubt, it is recommended to instead suspend a user, since suspension allows for re-activation and settings are maintained.
There is no option to modify user settings (such as Fax Settings, Notification Settings, Date Format & Timezone) for existing users in bulk. This can only be done for each user individually through the Edit User menu.
How to Import users in bulk
The GFI FaxMaker Online Administrator Portal provides a convenient way to add users in bulk by importing a CSV file containing the list of users to be added.
Follow these steps to bulk import users:
Step 1: Create CSV file
Create a CSV file containing the list of users to import to GFI FaxMaker Online. Ensure that the details are formatted as follows:
FirstName, LastName, NoFaxLine, SendingEmail, ReceivingEmail, IWS, DialingCode, AreaCode, FaxNumber, DepartmentName, CSID
Where:
| # | Name | Type | Required | Description |
|---|---|---|---|---|
| 1 |
FirstName |
String | Yes | The user's first name. |
| 2 |
LastName |
String | Yes | The user's last name. |
| 3 |
NoFaxLine |
Boolean | Yes |
Specifies whether a dedicated fax number is required to enable user to receive faxes. Set value as |
| 4 |
SendingEmail |
Email address | Yes | The email address from where the user sends faxes. |
| 5 |
ReceivingEmail |
Email address | No 1 |
The email address where received faxes are forwarded to. Up to three email addresses can be specified, separated by a semi-colon ( 1 This is required if both |
| 6 |
IWS |
Boolean | Yes |
Specifies whether a received fax will be retrieved via Inbound Web Services or sent via email. Set value as |
| 7 |
DialingCode |
Number | No | The international dial code of the country. For more information refer to Assigning fax numbers. |
| 8 |
AreaCode |
Number | No | The fax line area code. For more information refer to Assigning fax numbers. |
| 9 |
FaxNumber |
Number | No | The fax number. For more information refer to Assigning fax numbers. |
| 10 |
DepartmentName |
String | No | The department name to which this user belongs. |
| 11 |
CSID |
String | No | The name/number displayed during fax transmission. |
FirstName, LastName, NoFaxLine, SendingEmail, ReceivingEmail, IWS, DialingCode, AreaCode, FaxNumber, DepartmentName, CSID
Assigning fax numbers
Fax numbers must be purchased before adding users that can receive faxes (i.e. when NoFaxLine is set to False). If the fax number specified does not exist, GFI FaxMaker Online fails to add the user.
Refer to the examples below to understand how DialingCode, AreaCode and FaxNumber can be configured to assign fax numbers:
|
DialingCode |
AreaCode |
FaxNumber |
Description |
|---|---|---|---|
| <empty> | <empty> | <empty> | GFI FaxMaker Online assigns a random fax number from the list of available numbers. |
|
11 |
<empty> | <empty> | GFI FaxMaker Online assigns a random fax number with international dial code 11. |
|
11 |
<empty> |
1123456789 |
If number The international dial code must be included in the The |
|
11 |
234 |
<empty> | GFI FaxMaker Online assigns a random fax number from area code 234 and international dial code 11. |
Sample CSV entries
Example 1:
FirstName,LastName,NoFaxLine,SendingEmail,ReceivingEmail,IWS,DialingCode,AreaCode,FaxNumber,DepartmentName,CSID,
Joe,Bloggs,True,joe.bloggs@mydomain.com,,False,,,,Sales,
- A user Joe Bloggs from department Sales is added. No fax line is assigned so only a sending email address is specified.
Example 2:
John,Smith,False,j.smith@mydomain.com,j.smith@mydomain.com;john@domain.com,False,1,305,,,JSmithFax
- A user John Smith is added. He sends faxes from j.smith@mydomain.com and receives faxes on 2 email addresses. A random fax number is assigned that is located in the United States (dialing code 1) in Miami (area code 305). The CSID is set to JSmithFax.
Example 3:
Juan,Pérez,False,jperez@example.com,,True,52,,,,
- A user Juan Pérez is added that uses Inbound Web Services to receive faxes. A random number in Mexico (dial code 52) is assigned.
Step 2: Import CSV file
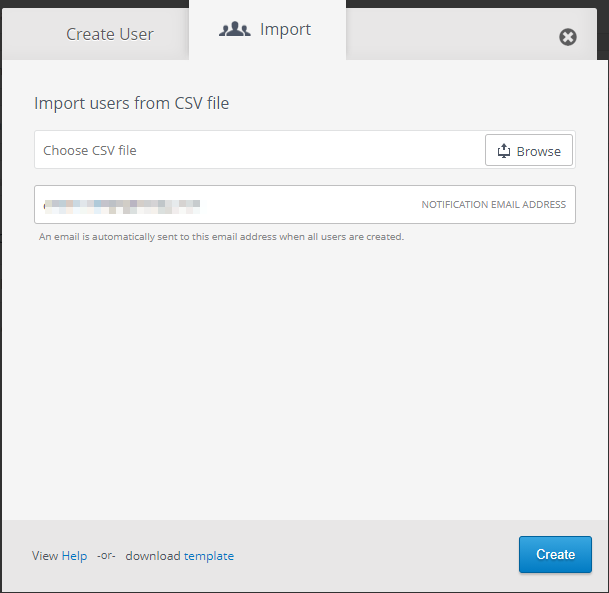
After adding all users to the CSV, import the file in GFI FaxMaker Online:
- From the GFI FaxMaker Online console, go to
 > Users node.
 - Click Add Users.
- Click the Import tab.
- Click Browse and choose the CSV file from Step 1 containing the list of users to import.
- In Notification Email Address key in an email address where to receive the result of the import process.
- Click Create.

Priyanka Bhotika
Comments